
If you have ever watched a house being built, you may have noticed a thick concrete band running just above the ground, right below the walls. This is the plinth beam. It looks simple, but it does a job that protects your entire structure for decades.
Many homeowners skip this step to save money. Some contractors rush through it without proper planning. The result shows up later as cracks, uneven floors, or even tilted walls. A small mistake at this stage can turn into a massive repair bill down the road.
This guide breaks down everything you need to know about a plinth beam and plinth beam design. You will learn what it does, why it matters, and how to get it right the first time.
What Is a Plinth Beam?
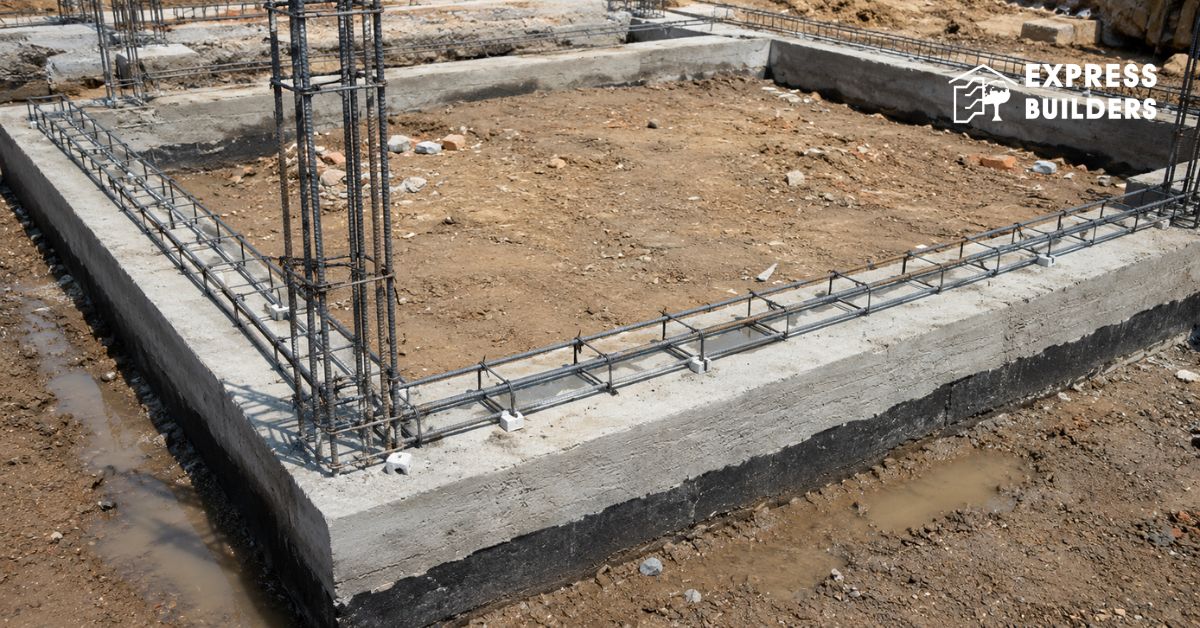
A plinth beam is a horizontal reinforced concrete beam. It sits at the plinth level, which is the point where the foundation ends and the wall construction begins. Think of it as a belt that ties the entire foundation together.
This beam runs along the perimeter of the building. It connects every column and footing into one unified system. Without it, each footing would behave independently. That independence creates weak points, especially in areas with loose or uneven soil.
The beam also lifts the wall structure slightly above ground level. This keeps moisture, termites, and ground water away from the brickwork. Your walls stay dry. Your building stays healthier for longer.
Why Plinth Beam Design Matters So Much
Skipping proper plinth beam design is one of the most common construction errors. Builders often treat it as a formality. That mindset causes real problems.
Here is why this beam deserves serious attention.
It prevents differential settlement. Soil rarely behaves the same way across an entire plot. Some patches compress more than others under load. A well-designed plinth beam spreads the load evenly. This stops one part of the building from sinking faster than the rest.
It controls cracking. Without this beam, walls rest directly on loose fill or footing edges. Any small shift in the soil transfers straight into the brickwork. Cracks appear within months. A properly designed beam absorbs that movement instead.
It improves earthquake resistance. In seismic zones, buildings need every bit of structural continuity they can get. This beam acts like a stiff ring that holds columns together during ground shaking. It reduces the chance of sudden, brittle failure.
It protects against moisture damage. Ground moisture rises through capillary action. A plinth beam, paired with proper damp-proofing, blocks that path. Your flooring and lower walls stay free from dampness and salt deposits.
It adds long-term value. Buildings with solid foundation detailing last longer. They need fewer repairs. They hold their resale value better than structures with visible cracks or settlement issues.
Key Factors in Plinth Beam Design
Good design depends on several factors working together. Skipping any one of them weakens the final result.
1. Soil Type and Bearing Capacity
Soil testing comes first. Sandy soil behaves differently from clay or rocky ground. Engineers use this data to decide beam depth, width, and reinforcement detailing. Guessing here is risky and expensive.
2. Beam Depth and Width
Most residential projects use a beam depth between 200mm and 300mm. Width usually matches the wall thickness above it. Larger structures or poor soil conditions may need bigger dimensions. A structural engineer should always confirm these numbers based on the actual load calculation.
3. Reinforcement Detailing
Steel bars give the concrete its tensile strength. Typical designs use four to six main bars, paired with stirrups spaced at regular intervals. Proper lapping and anchorage at the corners matter a lot. Weak corner joints are a frequent failure point.
4. Concrete Grade
Most plinth beams use M20 or higher grade concrete. Lower grades may save a little money upfront. They also raise the risk of cracking and reduced durability over time. This is not the place to cut corners.
5. Load Distribution
The beam must carry the weight of the walls above it and transfer that load safely to the footings below. Engineers calculate this using the building’s total load, number of floors, and wall material. Heavier construction needs stronger beam design.
6. Damp-Proof Course Integration
A damp-proof layer usually sits right above the plinth beam. This combination blocks rising moisture completely. Skipping this step, even with a strong beam, leaves your walls vulnerable to dampness.
Common Mistakes to Avoid
Construction sites repeat the same errors often. Here are the ones to watch for.
Builders sometimes reduce beam depth to save on concrete. This compromises strength. Reinforcement bars get placed without proper cover, leading to corrosion later. Curing gets rushed, which weakens the final concrete strength. Corners and junctions are left with poor bar overlap, creating hidden weak spots.
Avoiding these mistakes does not cost much extra. It just requires patience and proper supervision during the pour.
Steps to Get Plinth Beam Design Right
Start with a proper soil investigation report. Hire a structural engineer to calculate loads and finalize dimensions. Use quality concrete and steel that meet required standards. Supervise the reinforcement placement closely before pouring. Allow adequate curing time, usually a minimum of seven days, before moving to the next stage.
These steps sound basic. Following them consistently is what separates a durable building from a problematic one.
Plinth Beam vs Grade Beam: Are They the Same?
Many people use these two terms interchangeably. There is a small difference worth knowing.
A grade beam usually sits at or near ground level and often carries direct loads from the structure above, sometimes spanning between piles or deep foundations. A plinth beam sits specifically at the plinth level, marking the transition from foundation to superstructure.
In most residential and small commercial projects, the two terms overlap heavily. The function stays similar in both cases. They tie the structure together and reduce the risk of uneven movement. For larger or more complex projects, an engineer will specify which one applies based on the foundation type.
Final Thoughts
A plinth beam might be hidden once construction finishes, but its impact stays visible for years. Strong plinth beam design prevents cracks, controls settlement, and keeps moisture away from your walls. It also adds a layer of safety during seismic events.
Cutting corners here rarely saves real money. It usually leads to bigger repair costs and structural headaches later. Treat this stage with the same seriousness as any other major decision in your construction project.
A little planning today protects your investment for decades to come.
Ready to build on a stronger foundation? Talk to a qualified structural engineer before you finalize your construction plan. Get your soil tested, review your beam design carefully and avoid costly repairs later. A strong start today means a safer, longer-lasting home tomorrow. Contact us if you are planning to buy a property in NCR.
Frequently Asked Questions
Is a plinth beam compulsory for every building?
Not always, but it is highly recommended. Soft soil, multi-storey structures, and seismic zones almost always require it. Even simple single-storey homes benefit from the added stability it provides.
What happens if you skip this beam?
Walls rest directly on isolated footings. Any soil movement transfers straight into the brickwork. Cracks, tilting, and moisture issues become far more likely over time.
How long should the concrete cure before further construction?
Seven days is the general minimum under normal conditions. Hot or dry weather may require additional curing time and water spraying to maintain strength.
Does beam size change with building height?
Yes. Taller structures carry more load. Engineers increase beam depth, width, or reinforcement to handle that extra weight safely.